Monday, January 16, 2012

My New Toys (Ok, I mean tools)

Last year I moved a used industrial sewing machine into my room to replace the domestic sewing machine that I used for about nine years. It took me several weeks to get accustomed to the speed and handling of the industrial machine. Even though it's old and leaking oil, I FUCKING LOVE THIS THING.

sewingtools1

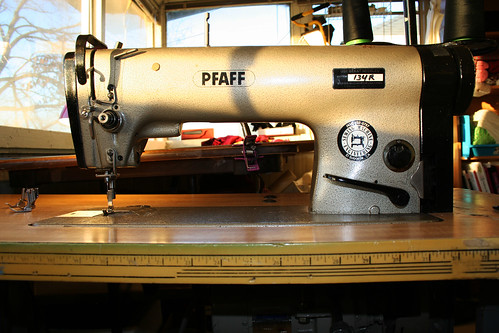
Using the industrial machine makes me wish I had switched to industrial YEARS ago. I had been using my mom's nice Elna machine, which worked the best out of any domestic machine I have ever used, but this old industrial works twice as well as the Elna! It's amazing!

One of its features is a knee pad that lifts the presser foot when you want to start and stop sewing. At first I thought the knee pad would be uncomfortable and hard to get used to, but after adjusting it a couple times I am hardly even conscious that I am using it. It speeds up sewing time just a bit and feels like second nature already.

sewingtools2

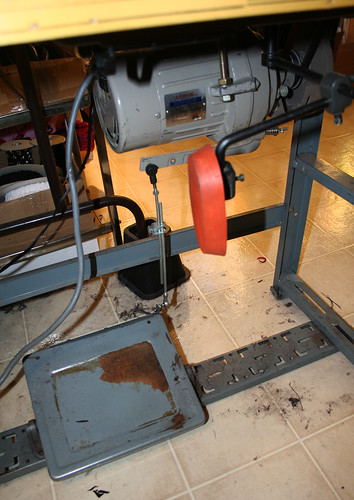
Please excuse my filthy floor, that's all fabric lint! I vacuum my sewing room frequently, but velboa faux fur produces an enormous amount of fabric dust when I cut into it.

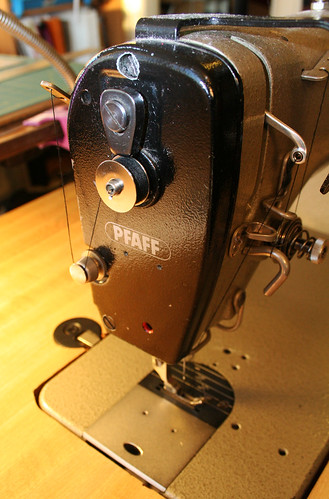
Another awesome feature is the bobbin winder that is located on the side of the sewing machine head. With domestic machines, you have to partially un-thread the machine and stop sewing completely while the machine winds thread around a new bobbin. With industrial machines, you just put an empty bobbin in the winder and it winds up while you sew with a new full bobbin. Switching the bobbins is easy and barely wastes any time.

sewingtools4

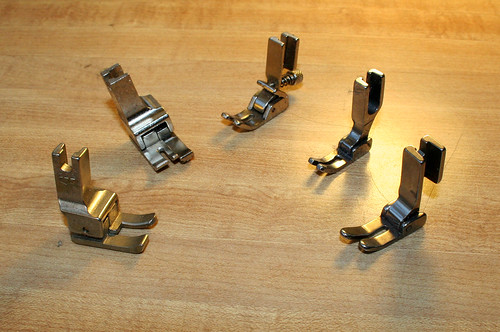
These machines can also be used with a variety of special presser feet and attachments to make it easier to sew a particular seam. I bought five different presser feet to see which ones could make my sewing easier. They ranged from $2.50 to $6.50 each. Shown below from left to right are two compensating feet, a shirring foot, a medium width zipper foot and a regular foot. A narrow width zipper foot that isn't shown was on the machine when I took the picture (but it does show up in the above picture). The compensating feet are for accurate top-stitching. The shirring foot doesn't work too well with fabric of average thickness, but it made some pretty tight gathers in some thin tulle that I used when I was experimenting with it. The screw at the back of the foot adjusts how much gathering you need.

sewingtools3

Below is a picture of the entire machine, including the thread tree. It has two spools of thread on it so that you can sew while you wind a new bobbin. I also keep thread snips and a small flathead screwdriver handy for changing the presser foot. The only annoying thing about this machine is that I know that the newer models of industrial machines have even more awesome features. Even though I've gone a huge step forward in my sewing speed and ability, there's still room for improvement! The machine that I described in this previous blog post talks about a current top-of-the-line industrial machine.

sewingtools5

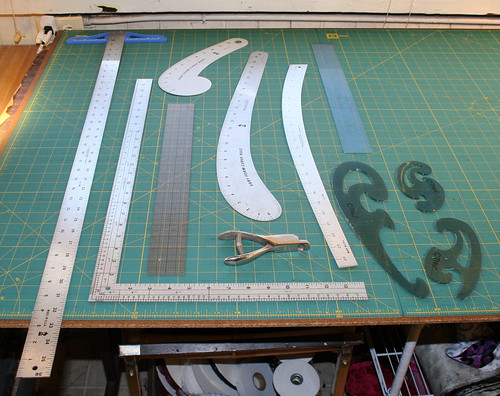
I also recently bought some new patternmaking rulers. When I first took patternmaking at the local community college, I bought an 18" C-Thru ruler and some curved C-Thru rulers, as well as a metal L-square and a long curved metal ruler. A couple weeks ago I bought a longer T-Square (the 36" long ruler on the far left), a hip curve (the metal ruler on the right) and an armsceye ruler (the small curved metal ruler at the top). These rulers can get pricey. I paid over $20 for the longest metal ruler. But after years of dealing with too-short rulers, it was totally worth it. It's difficult to cut patterns out on the fabric grainline if your pattern grainline doesn't run the entire length of the pattern piece, and you need a ruler that is longer than your pattern piece to mark a completely accurate grainline. I could probably use an even longer ruler than the 36", but that purchase will have to wait for now.

What I really need is a bigger cutting table, but I'll save that story for later.

sewingtools6

If there are home sewers reading this who are interested in altering their patterns, I would recommend purchasing the 18" C-Thru rulers and the curved C-Thru rulers. They sell them at office supply and craft stores, and they are less than $5 each. The 18" C-Thru ruler is great for changing seam allowances and making small changes to pattern measurements. If you start to really get into patternmaking then you'll need the other types of rulers.

The other tool on the table in this picture is a pattern notcher. It marks a tiny slit into the pattern for matching up seamlines. Home sewing patterns typically have notches that are shaped as triangles going outside the pattern edge, but those are really annoying to cut out. The pattern notcher makes marking notches easier.

The last new thing that I bought recently is a small roll of patternmaking paper. This stuff has a grid on it that should make it easy to make pattern pieces symmetrical. It works well for drafting, but for permanent patterns I need some thick manila cardstock paper. I still have some left over from the free paper stash that I got from my school. (It WAS free, I swear!)

sewingtools7

If any fellow seamstresses are interested in this stuff, I purchased the presser feet from South Star Supply and the rest of the stuff from Atlas Levy. (The presser feet only work for industrial machines, not the domestic machines that most people are used to.) If you are as much as a sewing nerd as I am, you will end up going through every product page on those websites, amazed at how many random sewing tools and machines there are. The more I learn, the more I realize I don't know!

Some other tools I keep handy are different sizes of screwdrivers and wrenches for adjusting settings, cleaning, or changing out parts on my industrial sewing machines. A can of gas duster keeps too much lint from building up on the parts, and regular oiling keeps the sewing machines from destroying themselves. Atlas Levy sells sewing machine oil by the gallon, but since I don't go through it very fast I bought the smaller pint-sized bottle.

I plan on posting pictures of my entire sewing room later on. I'm kind of amazed at how much stuff I have accumulated over the years. Forget the tools, you should see my book collection!

Tuesday, January 3, 2012

Pattern Making Tips: Watch out for Store-Bought Patterns

*This post originally appeared on derangeddesigns.com. In 2018 I moved it to this blog and backdated it to the approximate date that it was first posted.


Recognize the brand names Burda, Butterick, McCall's, and Simplicity? If so then you are probably familiar with the frustrations of using store-bought patterns. Unfortunately, store bought patterns are usually full of mistakes. Sometimes seams don’t match up perfectly, or the directions don’t make sense, or even the design itself is drafted wrong. If you make something from a store bought pattern and it ends up looking like shit, don’t blame yourself. Blame the lazy manufacturers of the pattern. Real patterns made in the garment industry cost hundreds of dollars. Store bought patterns cost only a couple bucks (when you buy them on sale, of course) so they are far from perfect.
I’m not saying that you should avoid buying them, though! Store-bought patterns can be useful when you are learning patternmaking. Buy a simple pattern that is easy to sew up and then practice altering it. Check it for mistakes and then research how to fix them yourself.
There are also independent patternmakers that sell their own patterns over the internet. They probably charge a little more than the fabric stores and they send you the pattern to download and print out yourself. Watch out for these sellers, too! I can’t speak for all of them, but I know that some will sell patterns that have just as many mistakes as the ones you buy at the fabric store. If possible, find online reviews of the pattern before purchasing it.

Pattern Making Tips: Terms & Tools

*This post originally appeared on derangeddesigns.com. In 2018 I moved it to this blog and backdated it to the approximate date that it was first posted. 

Basic Patternmaking Terms

Flat patternmaking: using a previously made pattern to create new patterns while working on a drafting table.

Draping: cutting and pinning fabric to a dress form in order to create a new design. The fabric is removed from the dress form and traced on to pattern paper to make a usable pattern. I am not very experienced in draping so I will not discuss it in this series.

Block: a basic pattern that fits well that can be altered to make many different styles. For example, I have altered my basic hoodie block into many other hoodie styles: a hoodie with inset pockets, a princess lined hoodie, a fully lined hoodie, etc.

Grading: making a finished pattern in different sizes. This is complicated and requires a lot of math. I can grade simple patterns by myself, but for complicated patterns I create my own grading specifications and then pay a professional pattern grader to do the work. For example, for my tank top pattern I gave the pattern grader a size medium to start out with and then had her grade it into sizes XS, S, L, and XL. I told the pattern grader which bust/waist/hip measurements that each size was supposed to have, and then she did the complicated grading work and sent back the completed pattern in the different sizes I wanted.

Computer Patternmaking/CAD/computer-aided design: using a specialized patternmaking computer program to create and grade new patterns. These programs are expensive (I think usually $5,000 to $20,000) and they also require a digitizer and a pattern plotter to use. (A digitizer is used to transfer a paper pattern into the computer program and a plotter will print out the finished pattern.)


The photo above is a screenshot of an assignment I did at school. You can learn computer patternmaking in fashion schools and some companies will rent out a student version of the program. The CAD programs I have learned in school are Gerber (super expensive) and Optitex (more affordable). I loved the classes and I wish I could use Optitex for all of my patterns. To use these programs you need to know the basics of patternmaking because they will not make the patterns for you.

Fabric Terms

Grain: the direction in which fabric is woven or knitted. You need to cut your patterns to line up with the grain or else the fabric will stretch in random places and not hang the way you intended. Some fabrics have a grain that is easy to spot, like the fabric below:

The lengthwise grain (parallel with the selvedge, or edge of fabric) is called the warp. It is usually more stable than the crosswise grain, which means that it does not stretch or move around as much. It also tends to shrink more than the crosswise grain when you sew with a type of fabric that shrinks in the wash. Most clothing is cut with the hemline perpendicular to the warp.

The crosswise grain (perpendicular to the selvedge, or warp) is called the weft. It usually stretches more than the warp, even with woven fabrics that are not made to stretch. Most clothing is cut with the hemline parallel to the warp. For example: a regular t-shirt has a hem that is parallel to the warp, so it stretches more across then it does from top to bottom.

Bias: a diagonal line slanting across the warp and weft grains. On woven fabrics the bias is the direction that will usually have the most stretch. You can cut garments at the true bias (a 45 degree angle from the warp and the weft) and completely change the way that the garment hangs. Bias cut is a popular way to make evening-wear because it can make woven satin fabric stretch and cling in an elegant way. If you want to look for examples of what you can do with bias cut, check out dresses by Madeleine Vionnet. She was the first to popularize bias cut dresses.

The photo below shows a piece of fabric with the selvedge running along the left side and the different grain directions labeled.

Grainline: a line that runs the entire length of the pattern that is used to line it up with the fabric grain during cutting. When I position my pattern pieces for cutting, I double-check that the pieces are aligned with the fabric grain by comparing the fabric grain to the pattern piece grainline with an 18" C-thru ruler.

Pattern pieces are usually cut with the grainline running parallel to the selvedge (warp).

Pattern Making Tools

Special patternmaking tools can be expensive but they are not totally necessary when you start out. If you are willing to splurge on a full set of tools, Atlas-Levy sells a great set of them: Fashion Designer's Carryall

60 Inch Flexible Tape Measure: These are available in longer lengths but I find that the longer ones are bulky and annoying. Use it for:
  • Taking body measurements (to get accurate measurements, hold the tape measure around your body so that it stays in place but does not cut into your skin)
  • Measuring the length of a curved seam (for when a regular ruler will not bend around the curve)

18 inch C-Thru Ruler: THESE ARE AWESOME!
  • Adding accurate seam allowances to pattern pieces
  • Making straight lines and grainlines on pattern pieces that are shorter than 18 inches

L-Square: you need one for making right angles. Use it for:
  • Large L-squares (24 inches) are great for making grainlines that are perpendicular to the hem of a pattern pieces. (shown above in the fabric terms section)
  • Shorter L-squares (8 inches) work for small pattern pieces like cuffs (shown below, plastic rulers are always cheaper than the metal versions)
  • The L-Square in the photo below is placed on the bottom of a sleeve pattern. It is showing that the hem of the sleeve is perpendicular to the sleeve grainlines. (It might not look like a perfect 45 degree angle because of the odd angle that the photo was taken in)


36+ inch ruler or yardstick: a good rule is to have at least one ruler that is longer than your longest pattern piece. This is important for tracing out accurate grain-lines. Professional patternmakers own many rulers that are much longer than 36 inches. Currently my longest pattern piece is my leggings pattern, which is under 36 inches so I do not need anything longer.
The 36" long ruler is shown on the far left of this picture:

Tracing wheel:
  • Trace grainlines and style lines from one pattern piece to a new piece of paper (you will need to do this when copying a pattern to thicker paper or copying a pattern to make changes without destroying the original copy)
  • Mock-up an existing garment by tracing stylelines through the garment to a new piece of paper


Pattern Notcher: cut notches (slits) into the seam allowances of your pattern (instead of cutting around the triangles on store-bought patterns). Notches are used to match up seams and to mark placement of design details like pleats and gathers.

Drafting paper: this is the thin paper that you use to make first drafts of your patterns. Once the pattern is finished and perfected, you can transfer it to oaktag (also called manila) pattern paper. Oaktag paper is thicker and will last much longer than thin drafting paper.


Basic tools that you probably already own: paper scissors, scotch tape, erasers, pencils, etc!

I spent a long time on this patternmaking guide, so please don't steal my information and put it on your site! If you want to reproduce it somewhere else on the web please email me first at info@derangeddesigns.com.

Monday, January 2, 2012

New Year's Sale! 15% Off on Select Items

All items that are made by 5th Culture, Carmin, and Folter Clothing are now 15% off.

This sale will last until January 10th.

You can find the sale items by browsing the women's clothing categories.

You can also click these links to see all sale items at once:

11045a

11043a

12020a